App Rating Reminder for ‘Windows Store’ apps

My older post is about the app rating reminder for windows phone. For Windows 8, it is similar only with little difference, so to clear it out, here is the code. The concept is that we will display a reminder every 3 times the application is launched until the user rates the app.You can write the code below in the page_loaded event as below:

private async void Page_Loaded(object sender, RoutedEventArgs e)
{

var settings = Windows.Storage.ApplicationData.Current.LocalSettings;
if (!settings.Values.ContainsKey("WasLaunched"))
{
Windows.Storage.ApplicationData.Current.LocalSettings.Values["ratingDone"] = "False";
settings.Values.Add("WasLaunched", true);
Windows.Storage.ApplicationData.Current.LocalSettings.Values["Count"] = 1;
}
else
{
var c = Windows.Storage.ApplicationData.Current.LocalSettings.Values["Count"];
int count = Convert.ToInt32(c);
count++;
Windows.Storage.ApplicationData.Current.LocalSettings.Values["Count"] = count;

if (Windows.Storage.ApplicationData.Current.LocalSettings.Values["ratingDone"].ToString() == "False")
if (count % 3 == 0)
{
MessageDialog msgDialog = new MessageDialog("Please rate the application", "App rating");

//OK Button
UICommand okBtn = new UICommand("OK");
okBtn.Invoked = OkBtnClick;
msgDialog.Commands.Add(okBtn);

//Cancel Button
UICommand cancelBtn = new UICommand("Cancel");
cancelBtn.Invoked = CancelBtnClick;
msgDialog.Commands.Add(cancelBtn);

//Show message
msgDialog.ShowAsync();
}
}
}


Now the methods for Ok and Cancel button:

private void CancelBtnClick(IUICommand command)
{
// nothing shall happen if we cancel
}

private async void OkBtnClick(IUICommand command)
{
Windows.Storage.ApplicationData.Current.LocalSettings.Values["ratingDone"] = "true";
await Launcher.LaunchUriAsync(new Uri(String.Format("ms-windows-store:REVIEW?PFN={0}", Windows.ApplicationModel.Package.Current.Id.FamilyName)));

}

In the OkBtn event, we are storing the package name of our application, While testing, it will lead to the store rating page but display an error message that App is no longer available. It will be shown once the app is on store.


Launch another app from within your app

If you want to open a url directly in your browser from within your windows phone 8/windows 8 app, you can use the following code in an async event.

await Launcher.LaunchUriAsync(new Uri(“http://en.wikipedia.org/wiki/UAE”));

This statement will open the ‘UAE’ search term page in Wikipedia website in your browser.

Now, if you want to open Wikipedia app installed in your phone, add the following code in your async event:

await Windows.System.Launcher.LaunchUriAsync(new System.Uri(“wikipedia://”+”UAE”));

This will prompt the user to first install Wikipedia app on windows phone 8 if not installed and then navigates to a page showing ‘UAE’ search term result.

Make a picture in your wp8 app your lock screen background

If you want to make an image within you application as your lock screen image, you just need to follow these simple steps. For eg. , you have an album app where you have your pictures stored and you want to make one of those as your lockscreen background. So, instead of saving your picture and going to setting to set it as background, just click a button and have it there! Enable this feature in your apps by following:

1. Create a project and add an image to the page that you want to make the lock screen background. (Your photo or any image already added to the project works).  minion1
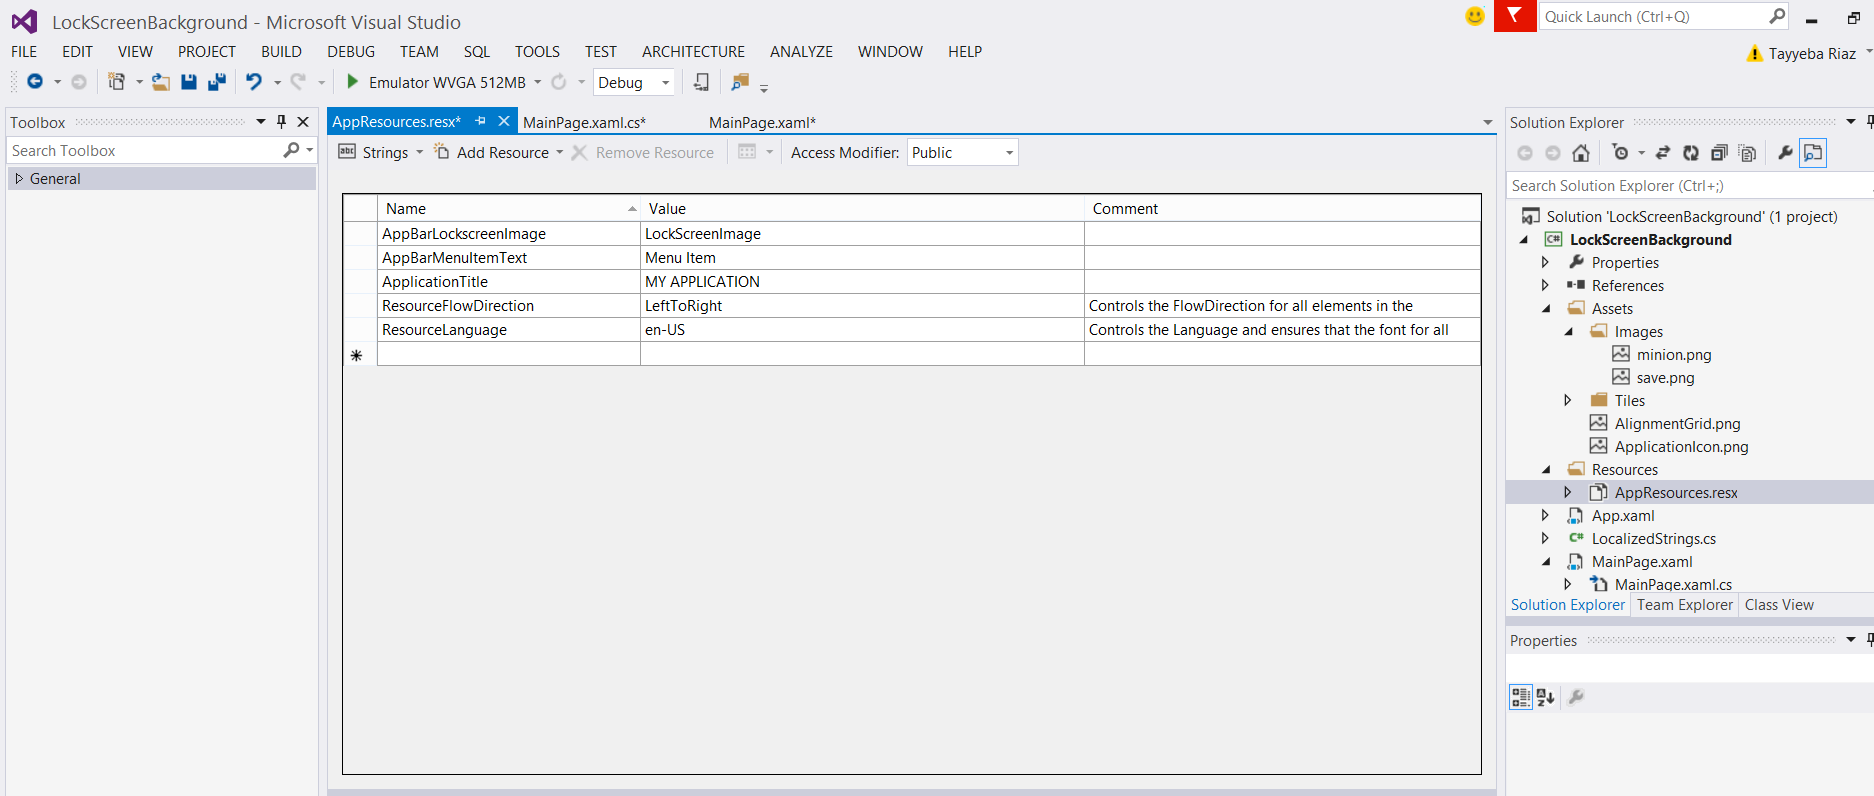
2. In the MainPage.xaml.cs (or any other xaml file you are working on), uncomment the ‘BuildLocalizedApplicationBar()’ in the constructor. Also uncomment the method implementation down in the same page.

3. Open the AppResources.resx page in Resources in the solution explorer.

4. Replace the appbarButtonText by AppBarLockScreen and replace the text beside it by LockScreenImage

minion2

5. Replace the application bar button code by this: (The image (save.png) is the one to be shown on app bar button

ApplicationBarIconButton appBarButton = new  ApplicationBarIconButton   (new Uri(“/Assets/Images/save.png”, UriKind.Relative));

appBarButton.Text = AppResources.AppBarLockscreenImage;

ApplicationBar.Buttons.Add(appBarButton);

6. Comment out or remove the app bar menu item code.

7. Then add an event to appBarButton by typing appBarButton+= (press TAB twice) to generate the method stub also.

8. In the event handler for appBarButton, replace it by following code:

minion4

9. Add using Windows.Phone.System.UserProfile; at the top.

10. Now the code is ready but you need to add an extension to the app to enable the app to be recognized as lock screen background provider. For this, right click on the WMAppManifest and click on ‘Open with’. Select ‘XML (Text) Editor’. Add the following code under <tokens> tag:

<Extensions>

<Extension

ExtensionName=”LockScreen_Background”

ConsumerID=”DFF24-AA15-4A96-8006-2BFF8122084F}”

TaskID=”_default” />

</Extensions>

Don’t add the <Extensions> start and end tag in this code if already present there.

11. Now run the application. And to lock the screen, first open the simulation dashboard from tools->Simulation Dashboard.

minion3

12. Now click on the button in the app bar. It prompts the user to confirm to make the
picture the lock screen background.

minion 5

13. Click ok and select locked under lock screen in simulation dashboard. Look in the emulator and your picture is the lock screen background!

minion 6

Launching your WP8 application by voice and navigating to another page

Users can launch an app by using voice i.e speak out the name of the application to start it or lead to another page. For eg. You can enable your app to do this by tapping the start button for a bit long and saying out ‘name of the app’ + ‘start’ to launch it or you can also make it open another page within the app by saying ‘ name of app show page name’. You can use different words as required to perform these actions. You define these commands etc. in a file. The voice command shall always starts with a command and then the next part (start or show) is defined by you. Following are the steps to launch an application by voice:

1. First of all, create a Voice Command Definition (VCD) file by right clicking your project name in solution explorer and selecting add->new item->VCD (under Visual C#), rename it to VoiceCommands and click Add.

VCD1

2. Next, expand the properties in your solution explorer and open WMAppManifest.xml file. Click on the capabilities tab and enable ID_CAP_SPEECH_RECOGNITION, ID_CAP_MICROPHONE, and ID_CAP_NETWORKING to use the voice commands in your app.

3. In the Properties window, set Build action to Content, and then set Copy to output directory to Copy if newer.

4. The default VCD file looks like this:

VCD25. The CommandPrefix is optional but can be set to if we localize our app so that we can initiate the app with the CommandPrefix set according to each language that our app supports.

  • The CommandPrefix should always be pronounceable. For eg. If your app name consists of ‘3’ or ‘_’ etc, you shall not include them in the CommandPrefix.
  • The CommandPrefix’s subset cannot be matched with what you speak. For eg. If you CommandPrefix is VoiceDemo, you cannot say Voice [Phrase] or Demo [Phrase]. But VoiceDemo [phrase] is recognizeable.

6. <ListenFor> tag contains words that are used to initiate the action in the Command element. <Feedback> tag is what will be shown in text while the voice commands is processed. The <Navigate> tag tells where the user will be directed.

7. Hence, our VCD file will have the following code inside Voice command tag:

VCD3

8. Next, initialize the VCD file to register the commands with the system to be listened for. Write the following code in the app.xaml.cs file in the Application_Launching event (Make it an async method):

await VoiceCommandService.InstallCommandSetsFromFileAsync(new Uri(“ms- appx:///VoiceCommands.xml”));

Also add this at the top:

using Windows.Phone.Speech.VoiceCommands;

9. Now when you run the app, press the start button to goto start screen, then again press and hold the start button until ‘Listening…’ screen appears. Say ‘VCD Demo Start’ to navigate directly to main page or say ‘VCD Demo show Page 2’ to navigate to page 2.

And that’s all. Just a few simple steps to launch your app by voice! Happy coding 🙂

Comparing Windows 8 and Windows Phone – Path to windows phone and windows 8 convergence (Part 1)

How can you make your apps in such a way that you can reuse your code for both the platforms.
After this blog, you should have a good understanding of:
-Major similarities and differences between windows phone 8 and windows 8
-How to build for both platforms with major code reuse

The blog doesn’t cover:
-Writing a windows phone 8 or windows 8 app and code that automatically runs on both platforms (impossible)

WINDOWS 8 PLATFORM:
I will focus mostly on c# in Windows store apps which is an easy overlap between wp8 and windows 8

Windows 8 platform

WINDOWS PHONE API

In the past, in windows phone (especially wp7), it was all about .NET, C# and VB. But eventually when we moved to windows phone 8, it included a runtime that additionally has C++ and finally the Direct3D, XAudio2, MF etc. are added which can be done in C++.

Windows Phone API

Comparing Windows 8 and windows phone 8:

FORM FACTORS:

WINDOWS PHONE 8

WINDOWS 8

Comes in 3 form factors (800×480, 1280×720, 1280×768)   Comes in many factors (1024×768(min) and more)
Can be used in portrait and landscape, but most apps are built to be   used in portrait. Can be used in portrait, landscape, snapped (smaller screen along left hand side), filled (remainder of screen when use snap view)
Screen size is small – <5 inch screen (as obviously it has to fit in pockets ;)) Has a larger screen size – 10 inch screens+ (as tiles scroll horizontally)

USER EXPERIENCE CONSIDERATIONS:

Windows Phone

Windows 8

It is mostly in portrait view   and is used with one handed touch for scrolling and typing Windows 8 as a tablet is meant   to be held with 2 hands.
Guarantee of specific hardware   like camera, accelerometer etc. No guarantee of specific   hardware (have to check whether a specific feature is available on the device the app is installed on)
Due to small screen size,   multiple columns of content should be avoided (scroll up/down for more   content) Can have more columns of content   because of organized screen and larger screen size (scroll left/right for   more content)
Limited room for options on app   bar Significantly more room for options on 2 app bars (on top and bottom)
Guarantee hardware back button No hardware back button but an onscreen back button available
No semantic zoom Semantic zoom available

XAML NAMESPACE AND CONTROLS:
There is a huge overlap between controls on both platforms. Many of the controls are same, many of them are separate in both platforms and there are many controls that are present in both platforms but in different namespaces:

  • Windows.XAML.UI.Controls contains Windows 8 controls
  • Microsoft.Phone.Controls and Microsoft.Phone.Shell contain Windows Phone 8 controls.
  • An example:
    • Windows.XAML.UI.Controls.Canvas (Windows 8)
    • System.Windows.Controls.Canvas (Windows Phone 8
  • Unsupported controls on the other platform:
    • For example <pivot></pivot> – specifically designed for windows phone so it is not supported by windows 8

Some examples of controls in different namespaces are:

Windwos Phone 8

Windows 8

PhoneApplicationPage is the root element Page is the root element
LongListSelector used to show vertically scrolling content ListView to show vertically scrolling content
Pivot control is used to page content horizontally FlipView control is used to page control horizontally
ApplicationBar control is used AppBar control is used
                        ———— GridView is used to group content in a grid

DATA MODEL AND SUPPORTING CODE:

Because only developers can clearly understand the code, hence the user interface should be separated and not included in the code in data model. Data model makes the project organized and portable to be reused on other platforms. So, data should always be put in data model to reuse and leverage the APIs that are portable between the two platforms.

LOCAL STORAGE:

  • Both platforms support storage of key/value pairs. It uses isolated storage to keep any app isolated from another app on that platform (for security and isolation purpose).
  • WP8 supports SQL CE while Windows 8 has no built in Microsoft SQL database but it has other SQLite Libraries available that can be downloaded and used.
  • Both platforms have a shared API in Windows.Storage namespace.
  • WP8 APIs are a subset of the full APIs, hence, not all of Windows 8 APIs are available on WP8. E.g. No roaming data store, temporary data store, local settings, roaming settings

APPLICATION LIFECYCLE:

Different app lifecycle for windows phone and Windows 8

application lifecycle

On both platforms:

  • CPU resources are consumed only by any foreground app.
  • In windows, any other apps become suspended and in windows phone they are deactivated.
  • On suspension/deactivation, background tasks are stopped to save the app state for which app is given time by both platforms.

There are certain events to be kept in mind:

Windows Phone 8:

Windows 8:

Derived from:   System.Windows.Application Derived from: Windows.UI.XAML.Application
Application_Launching OnLaunched
Application_Activated OnSuspending
Application_Deactivated
Application_Closing

That’s for now. Other similarities and differences will be covered in part 2. This is my first blog so do give your feedback.